
Things you can do by linking Watson
If you link ChatPlus and Watson, you can display appropriate reply automatically by analyzing message users entered. It is not Watson which creates the whole sentence, Watson choose the appropriate reply and display it from multiple replies prepared previously, so the problem of displaying sentences which makes no sense would not happen.
It can do various correspondence to questions that cannot be responded with prepared choices.
・Display a box to enter email address
・Notify phone number
・Display URL of support page etc...
In ChatPlus, there is a function to save chat history, by adding up answers to unanswered questions, you can improve the quality of answers in Watson.
Below shows the flow of displaying answers.
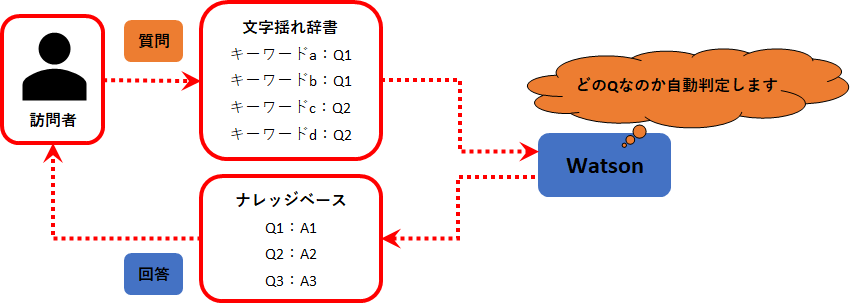
2.Register keywords (class) in spelling variants dictionary
※When you register question about business hour and its answers in the Knowledge Base, register class like "Starting hour", "Ending hour", "Regular holiday" and "Inquiry time".
3.When a user makes inquiry, Watson chooses the best answer from Inquiry from users, Q&A in Knowledge Base, and Registered class information.
How to link with Watson
Here, it explains how to link with Watson. Process the setting by following these below.
■2.Create IBM Cloud account (Light・Account)
■3.Upgrade account
■4.Register Natural Language Classifier
■5.Register acquired information on ChatPlus.
■6.Register Knowledge Base
■7.Set free words and make Watson learn
■8.Set Chat bot+
Improve quality of answers
By setting up like these below, you can improve quality of Watson's answers.
Manage Knowledge Base・Freeword
With these procedure below, you can manage Knowledge Base and free words.
■2.Export Knowledge Base in CSV form
■3.Import free words in CSV form
■4.Export free words in CSV form
1.Prepare link
If you want to link with Watson, please apply for AI Chatbot Plan, or contact ChatPlus from "Plan Change screen".
Here, it explains the procedure to apply.
Apply for AI Chatbot Plan
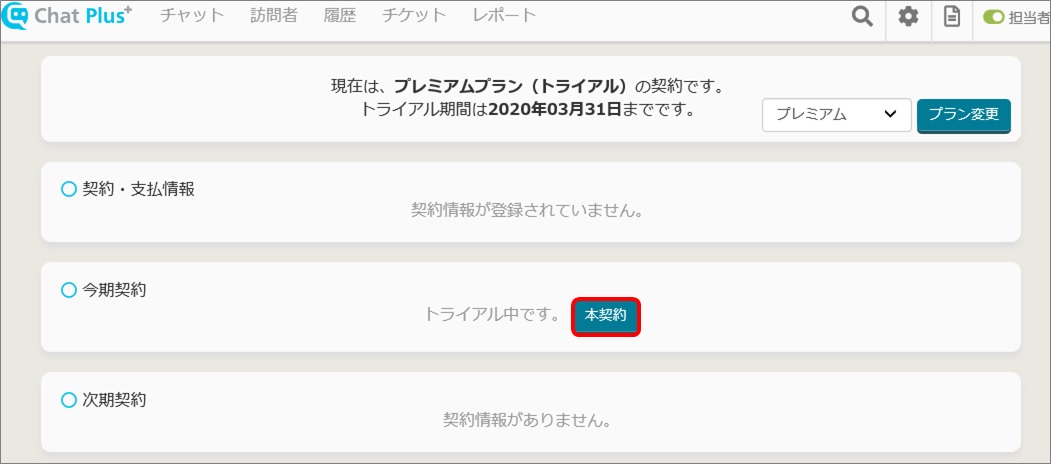
(1)Click [Plan] at the top right of the screen.
(2)Click [This term's contract]<[Contract] at the center of the screen.
※If you are already under contract, click [Change] of the next term's contract.
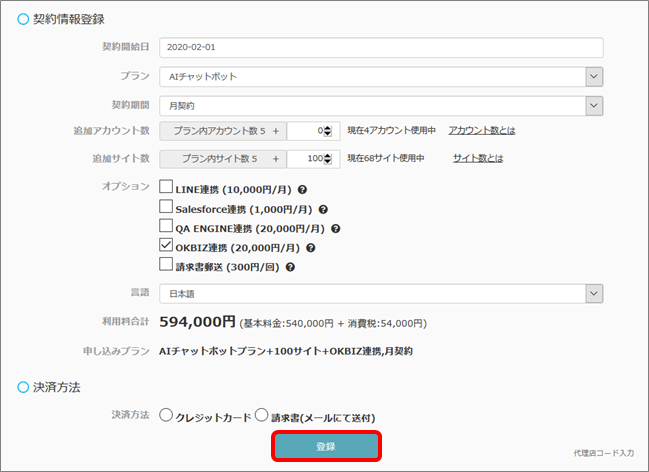
(3)Enter payment information and click [AI chatbot] from the "Plan" pull down.
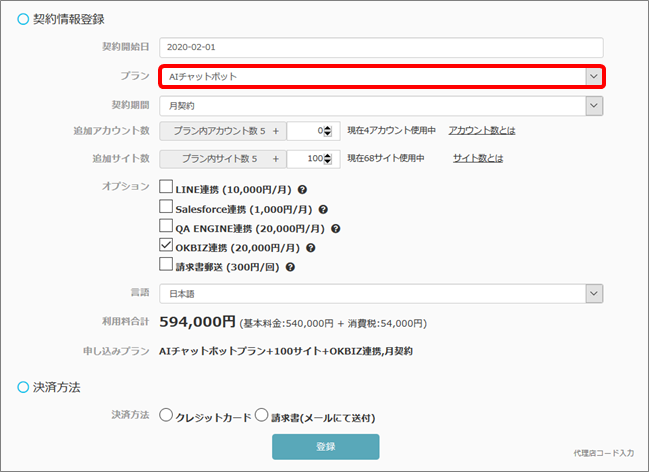
(4)Click [Register]
If you want to use this function right away, please contact support@chatplus.jp
Contact ChatPlus
(1)Click the setting button on the upper right of the management page. 
(2)Click [External link]>[App] on the left side of the screen. 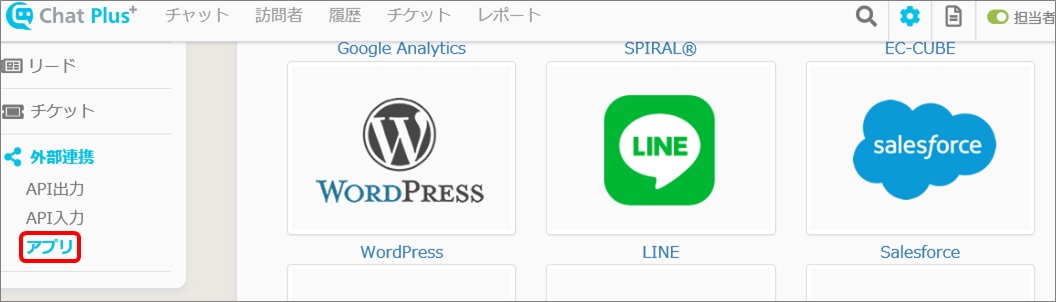
(3)Click [Watson] 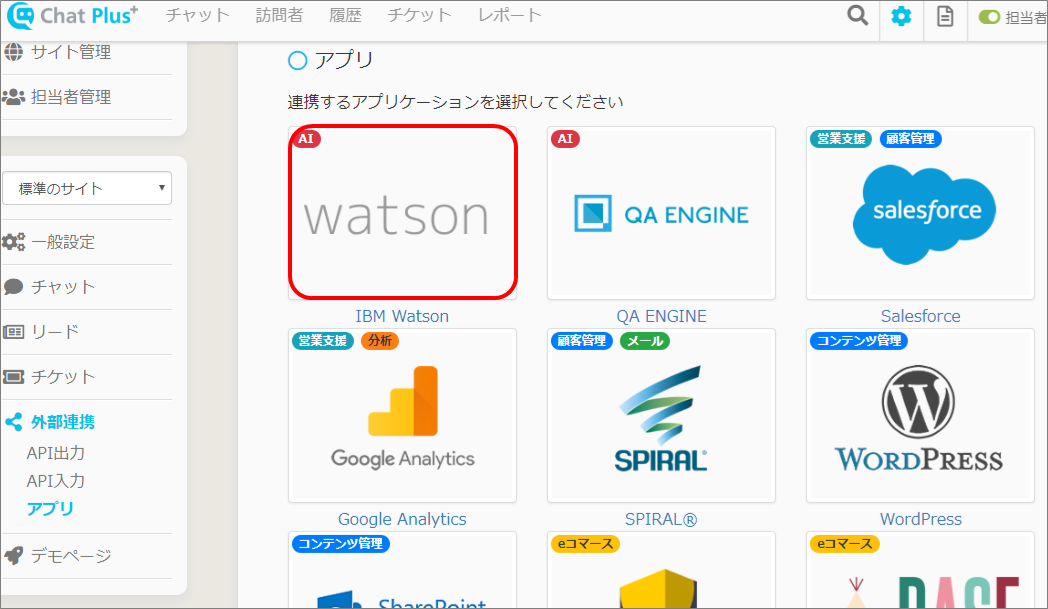
(4)Click [ChatPlus customer support] and tell that you want to link with Watson.

2.Create IBM Cloud account (Light・Account)
In order to link Watson and ChatPlus, you need to create「IBM Cloud account」
Here, it explains how to acquire Light・Account which is free.
→If you already have Light・Account, please proceed to 「3.Upgrade an account」.
→If you already have IBM Cloud account and Natural Language Classifier account, please proceed to「5.Register acquired information in ChatPlus」.
(1)Access https://console.bluemix.net/, and click [Create IBM Cloud account] on the left side of the screen.
(2)Enter necessary information and click [Create account].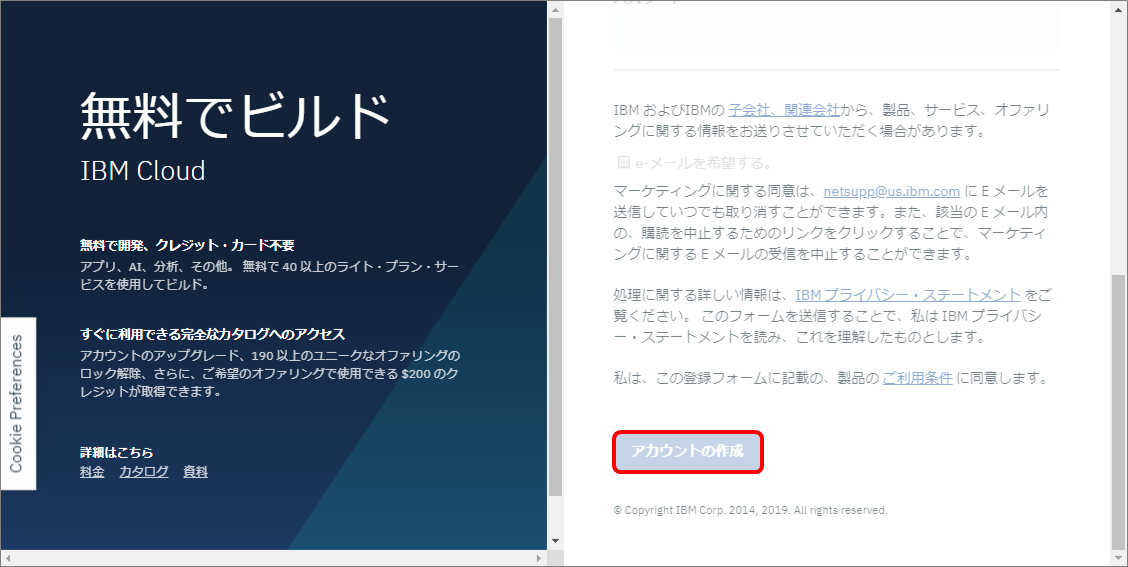
(3)You will receive an email from IBM cloud in the email address you registered in (2). Open the email and click [Confirm Account]. 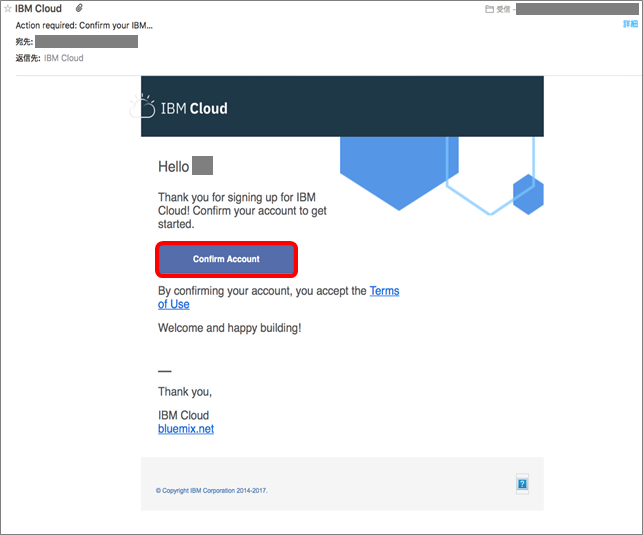
(4)When the screen below appeared, click [Log in]. 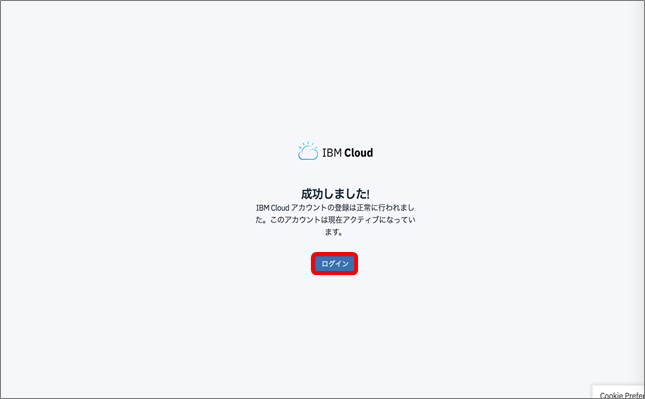
(5)Check Privacy Policy and if there is no problem, click [Next]. 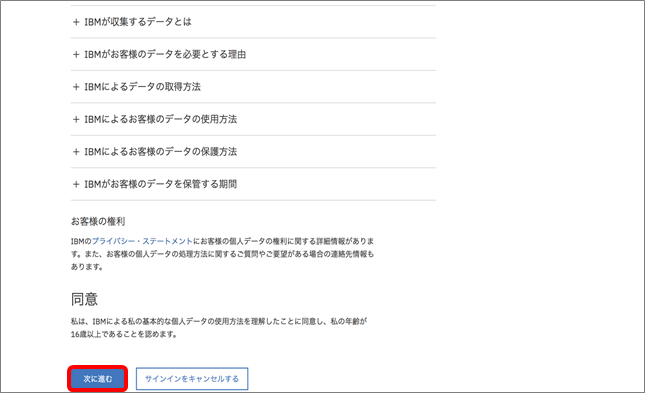
(6)If the Dash board screen appeared, the register for IBM account (Light・Account) has been completed. 
3.Upgrade an account
In order to link Watson and ChatPlus, you need to upgrade an account to「PAYG account」which costs money.
→If you already have PAYG account, please proceed to「4. Register Natural Language Classifier」
(1)Access https://console.bluemix.net/. After logging in, click [Account mark] at the top right of the page, and click [Upgrade Account] from the pull down menu. 
(2)Enter necessary information and check in [I accept the Cloud Services terms], and click [Next]. 
(3)If the screen below appeared, the procedure to upgrade has been completed. Click [Done] and go back to the Dash Board.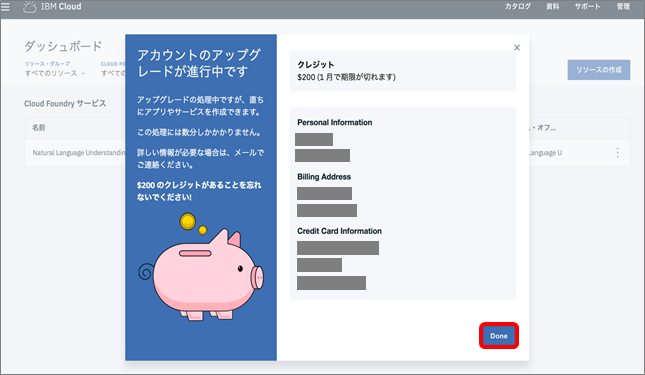
4.Register Natural Language Classifier
In order to link Watson and ChatPlus, you need to Register for Natural Language Classifier and acquire user name and password issued there.
Here, it explains how to do that.
(1)Access https://console.bluemix.net/, and click [Catalog] at the top right of the screen after logging in. 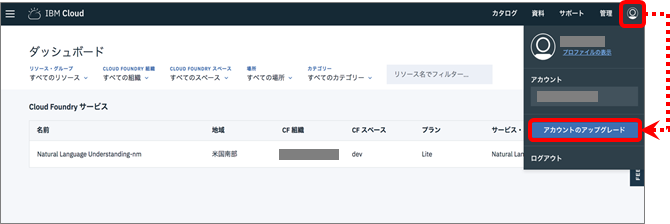
(2)Click [Watson] at the bottom left of the screen.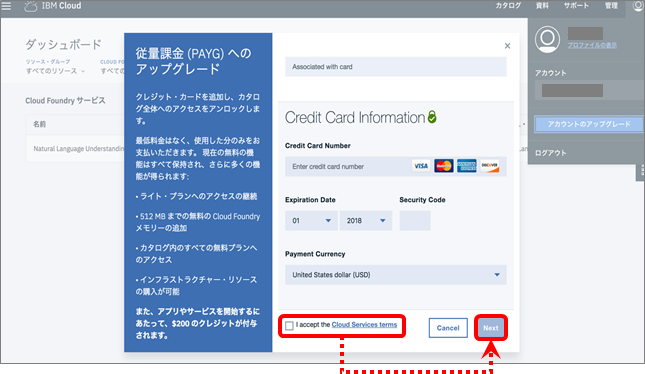
(3)From the icon list in the main screen, click [Natural Language Classifier].
(4)Scroll down to the bottom and click [Create]. 
(5)Click [Menu] at the top left of the screen. 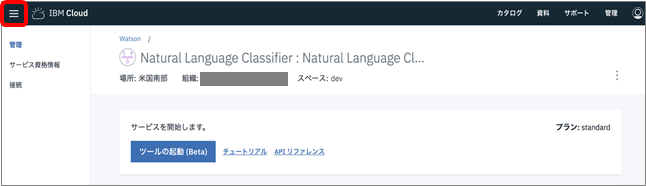
(6)Click [Dash Board] from the menu. 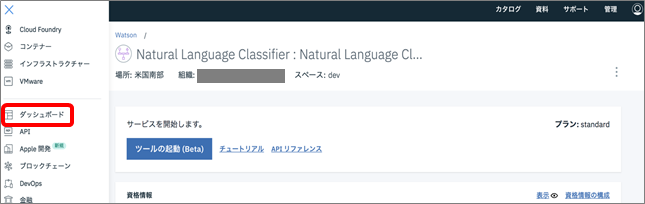
(7)Click [Natural Language Clasifier] which you created.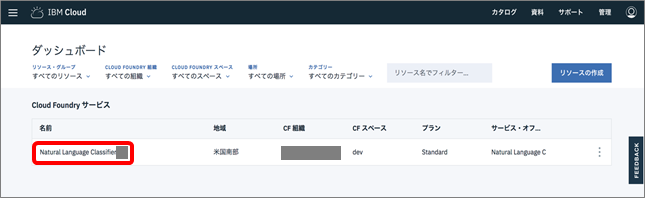
(8)If you click [Display], it will display user name and password, URL, or API key and URL. 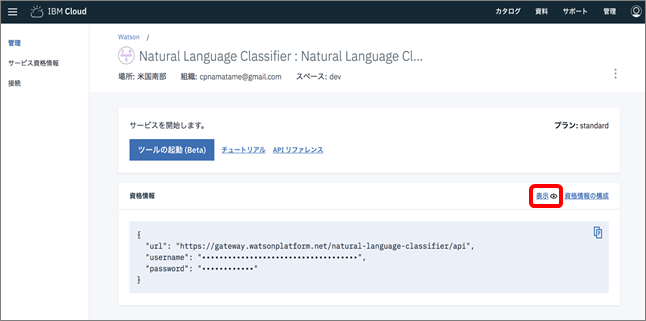
5.Register acquired information in ChatPlus
(1)Click the setting button on the upper right of the management page.
(2)Click [External link]>[App] on the left side of the screen.
(3)Click [Watson]
(4)Click [Authentication information] and enter user name, password, and URL (or KPI key and URL) which you acquired in [4. Register Natural Language Classifier] in the box.
※If you did not contact ChatPlus ahead, the screen [1. Contact ChatPlus] (4) will appear. Contact ChatPlus from there and try again later. 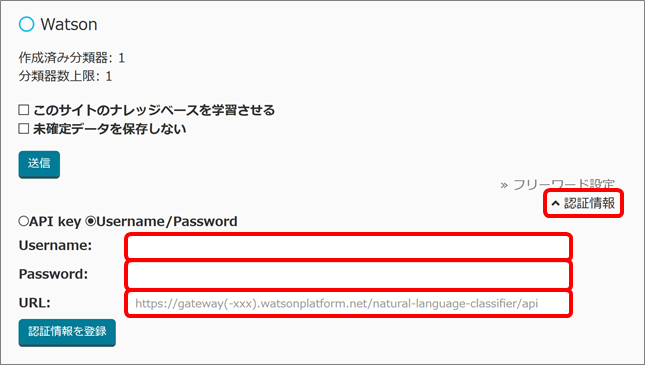
(5)Click [Register authentication information] 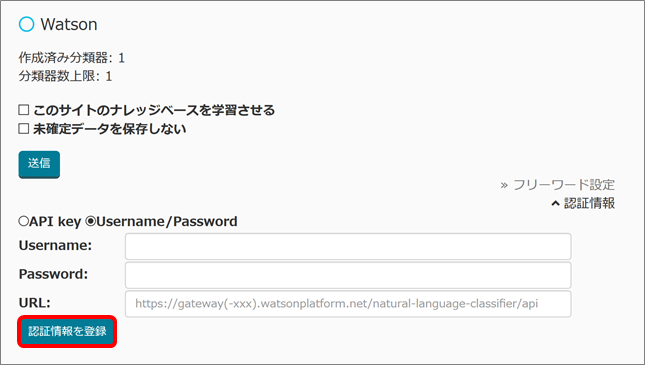
6.Register Knowledge Base
(1)Click the setting button on the upper right of the management page.
(2)Click [Chat]>[Function]>[Knowledge Base] on the left side of the screen. 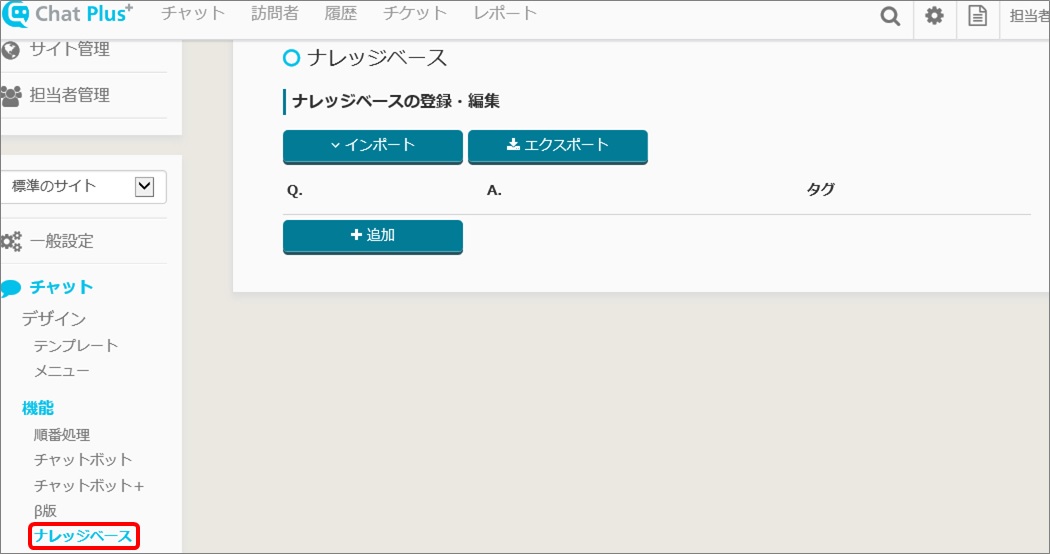
(3)Click [+Add] 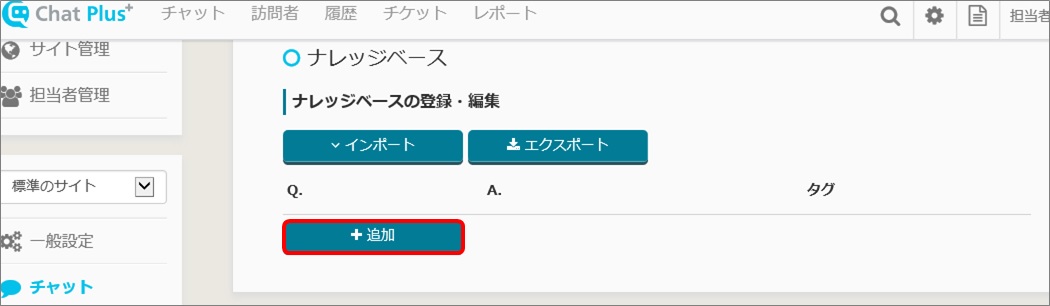
(4)Enter questions in [Q], enter answers in [A], and check in the box [Automatic register when learned].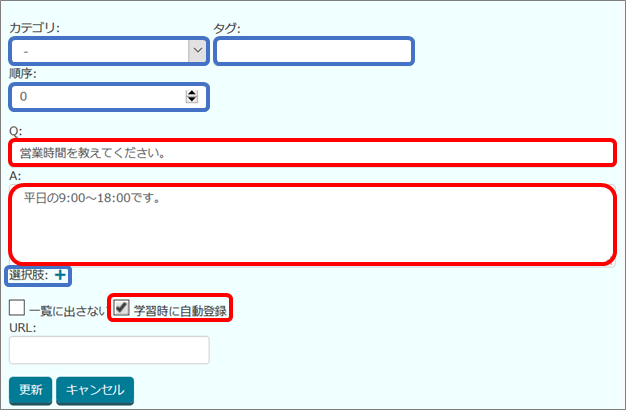
Category:You can designate category of Knowledge Base
Tag:You can designate tag in Knowledge Base
Order:You can designate an order to display
Choices:You can designate choices to display when applicable answers were answered.
Other enter boxes will not be used when linking with Watson.
(5)Click [Update]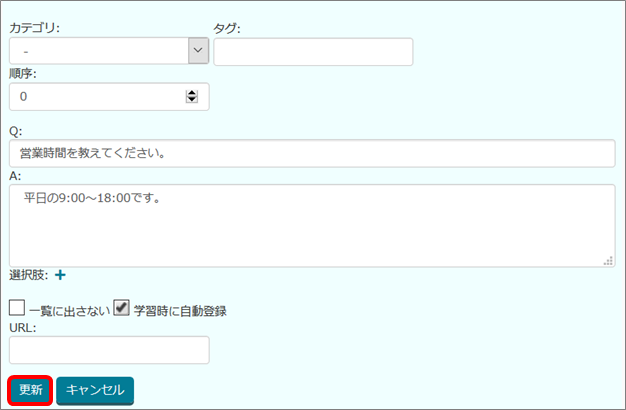
7.Set free words and make Watson learn
(1)Click the setting button on the upper right of the management page.
(2)Click [External link]>[App] on the left side of the screen.
(3)Click [Watson]
(4)Click [Setting of free words] 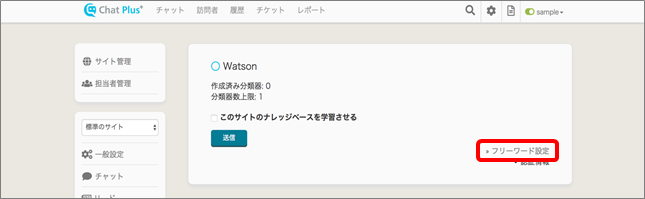
(5)Click [+Add]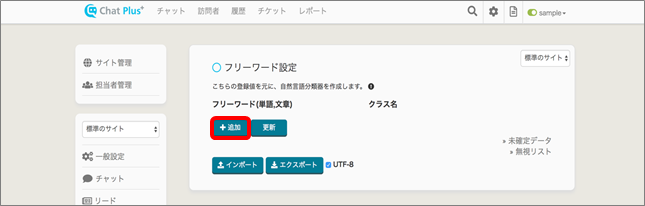
(6)In the box below "Free word", enter keywords like a sentence or phrase to invoke Knowledge Base data.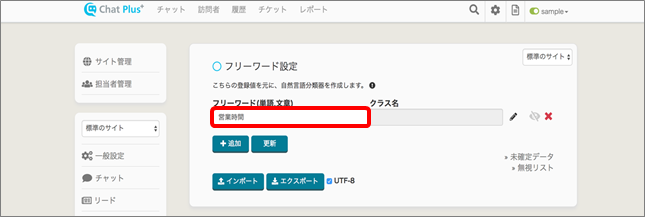
(7)Click [Edit](Pen's mark)
(8)The list of Knowledge Base will be shown in the new tab, check in the box beside the Knowledge Base you want to activate when certain word was entered. 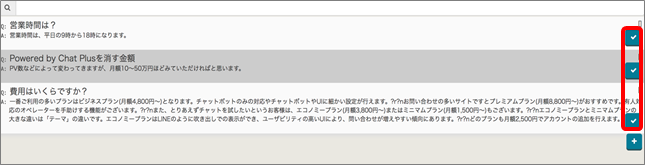
(9)Go back to the tab and confirm that the question registered in Knowledge Base in (8) is displayed. 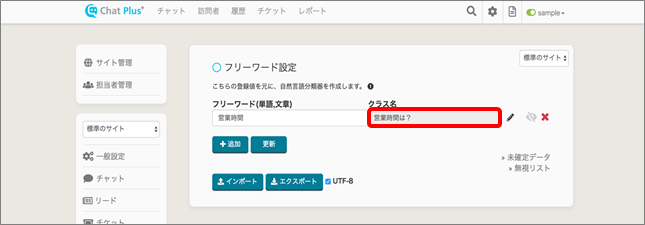
(10)Repeat procedure (5)-(9) and register at least 5 free words.
(11)After setting up more than 5 free words, click [Register].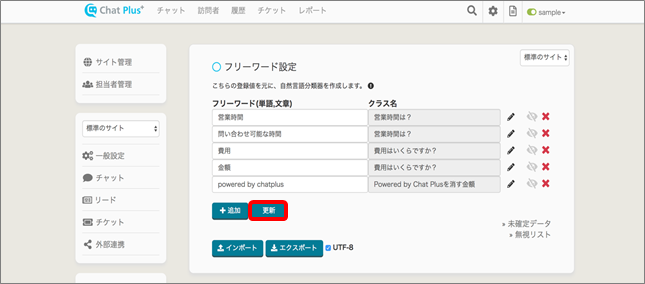
(12)Go back to Watson screen when the adding of free word was completed. Click [External link]>[App] on the left side of the screen.
(13)Click [Watson]
(14)Check in the box "Make Watson learn Knowledge Base of this site", and click [Send]
※Please note that it will cost hundreds of yens every time Watson learns something. For more information about costs, please make an inquiry to IBM. 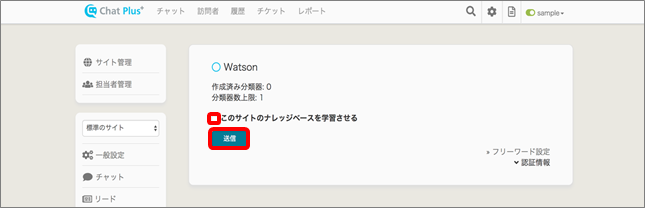
(15)If the number beside "Created classifier" is 1, the learning was completed.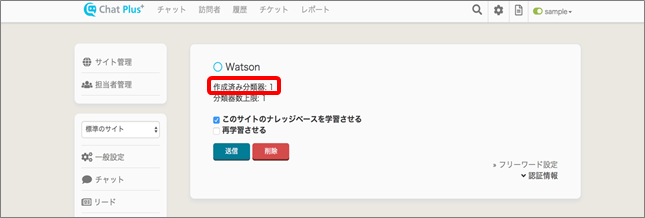
8.Setting of Chat bot+
Lastly, we will set the Chat bot+ and run the activation confirmation. The procedure below explains the setting to invoke appropriate answers from Knowledge Base by analyzing user's entered sentences when the user's remark is not [Hello].
Setting of Chat bot+
(1)Click the setting button on the upper right of the management page. 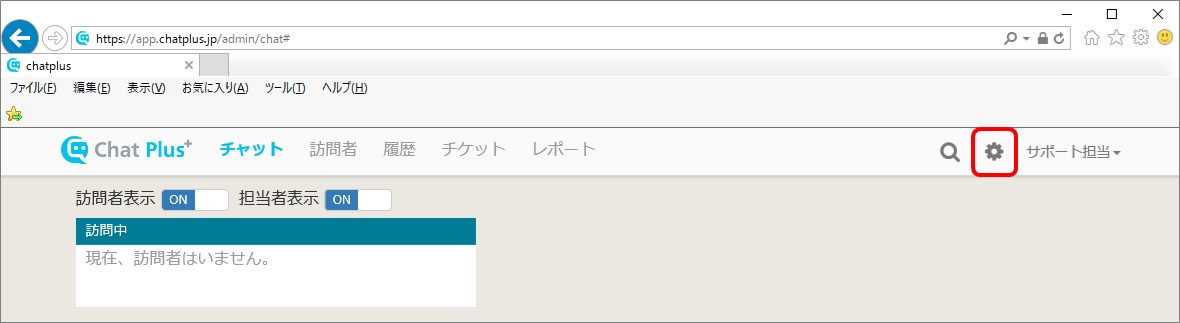
(2)Click [Chat]>[Function]>[Chat bot+] on the left side of the screen.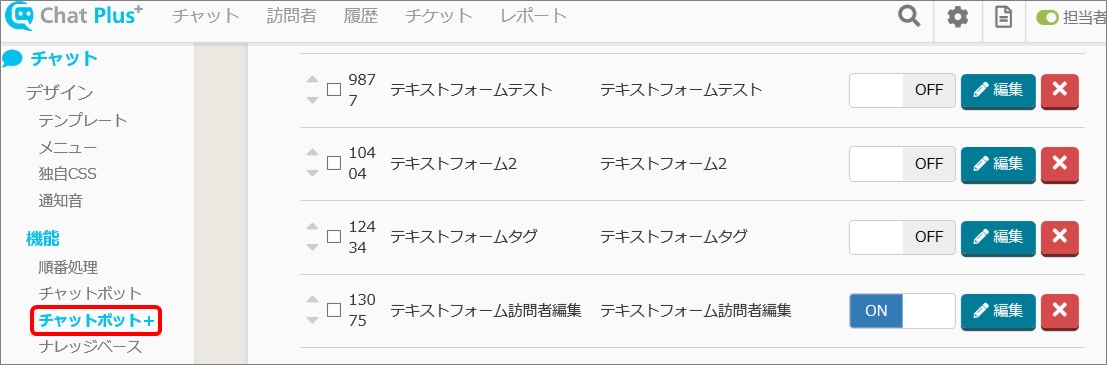
(3)Click [Add parts] 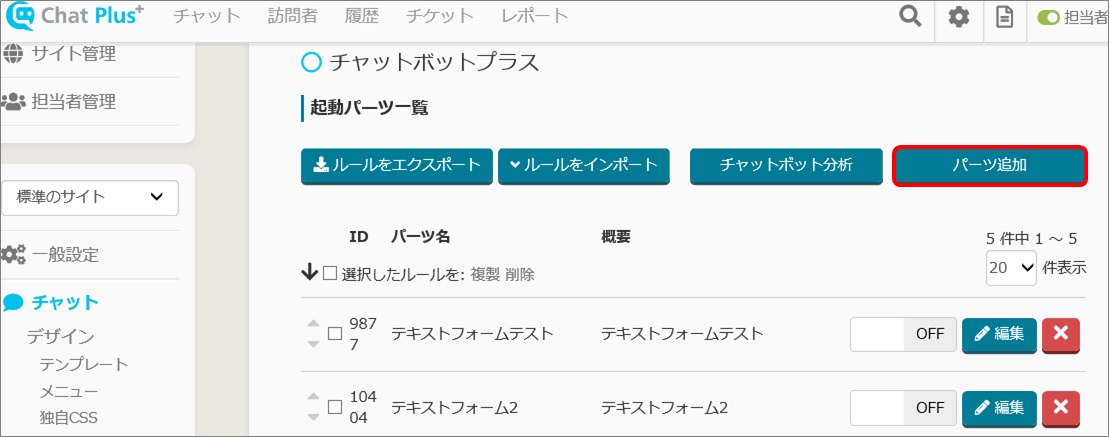
(4)Enter "Part's name" and "Details". Here, enter "Watson test" and "Watson linking test"
※Leave the box at the top right "ID" empty, it will automatically be filled when Chat bot+ is created. 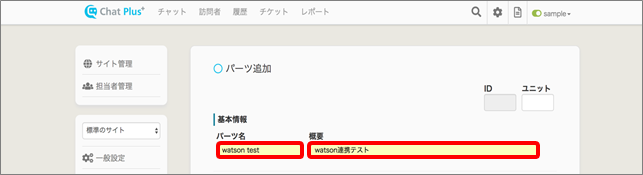
(5)Click [Add rules] 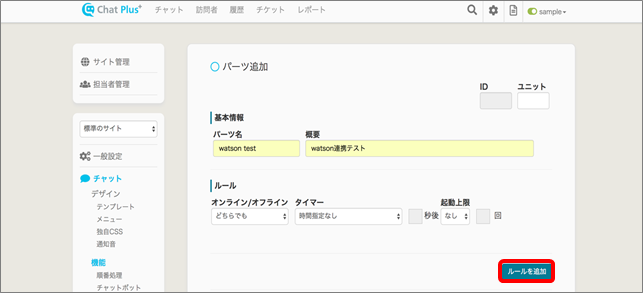
(6)In the section "Display rules", click [Unmatched with user's remark].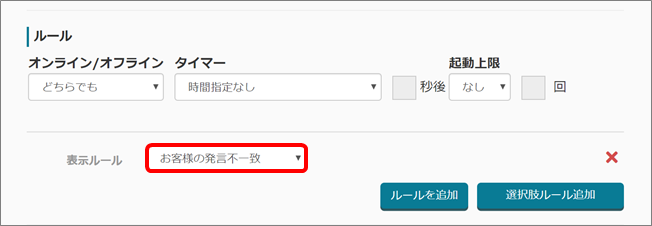
(7)In the section "Action", click [Link with Watson] from the pull down.
※This content will not be displayed if [7. Set free words and make Watson learn] was not completed.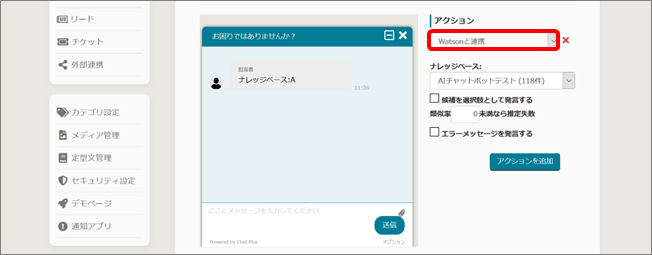
(8)Set an option [Link with Watson]. Following contents can be set.
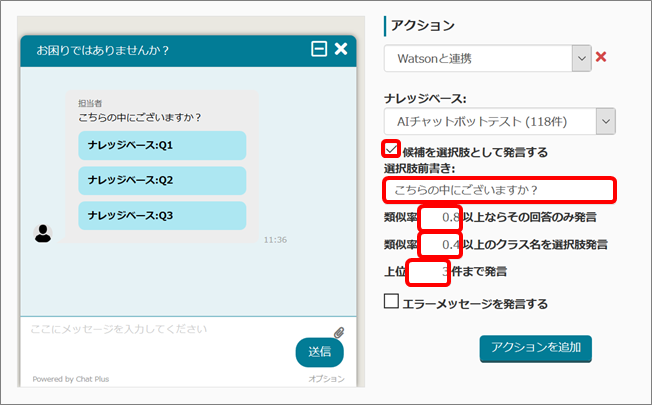 ・If you check in the box「Make a statement of a choice as a candidate」, it will display choices of questions which you set in [6. Register Knowledge Base].
 ・Enter text in「message before choices」, you can send a message before displaying choices.
・If you enter 0-1 numeric value in「Make a statement of the answer only when resemblance rate is above ---- %」, the answer will be displayed (not the question) as a choice when the resemblance rate is above entered numeric value.
・If you enter 0-1 numeric value in「Make a statement of class's name only when resemblance rate is above ---- %」, when the resemblance rate is above a certain number, you can designate question's resemblance rate displayed as a choice.
・If you enter numeric value in 「Make a statement max of --- cases of resemblance rate」, you can limit maximum number of choices in the message.
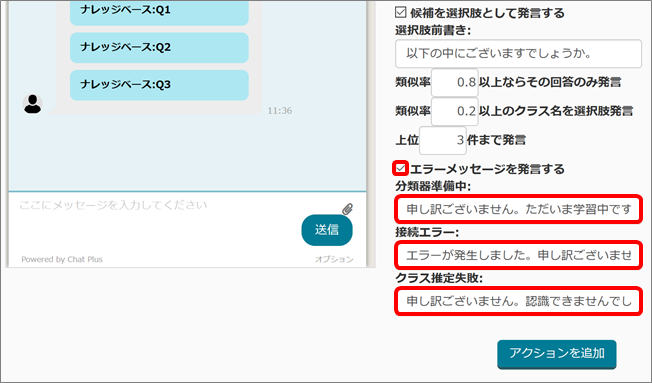
・If you check box in「Send Error message」, you can set error message like these below.
・「Preparing classifier」:When Watson is learning for the first time, or classifier is not prepared.
・「Connection error」:When unable to connect with Watson
・「Failed to assume class」:When the numeric value did not meet the designated resemblance rate set previously.
(9)Click [Update]
(10)The list of Chat bot+ activation parts will appear, check if the set part was added and the status is [ON].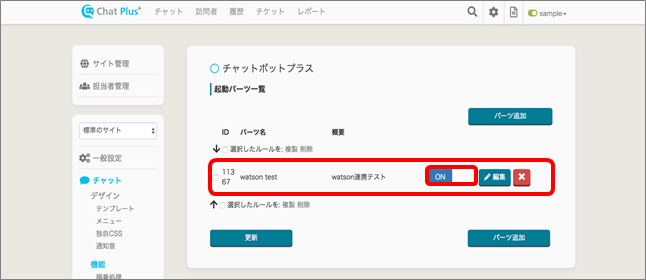
Activation confirmation
(1)Click the setting button on the upper right of the management page.
(2)Click [Demo Page] on the left side of the screen. 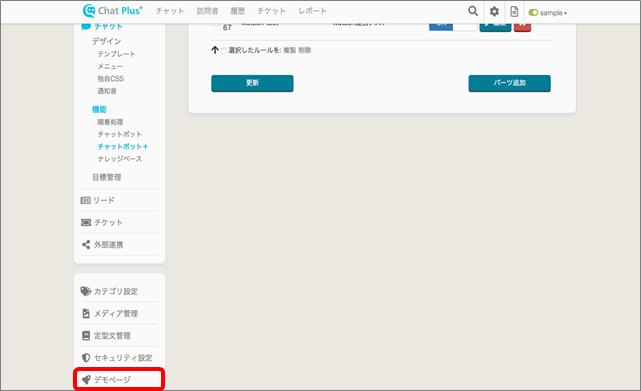
(3)Choose the site you want, here, we will choose "Corporate site".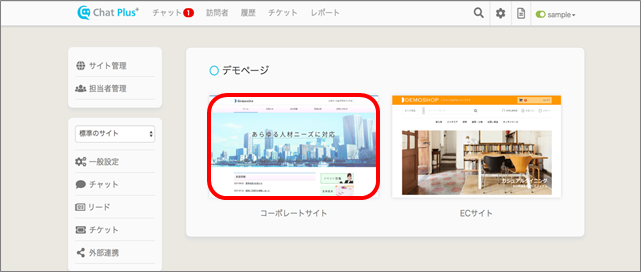
(4)Click Eye・Catcher and expand chat window.
(5)Click [Start chat] to start the chat. 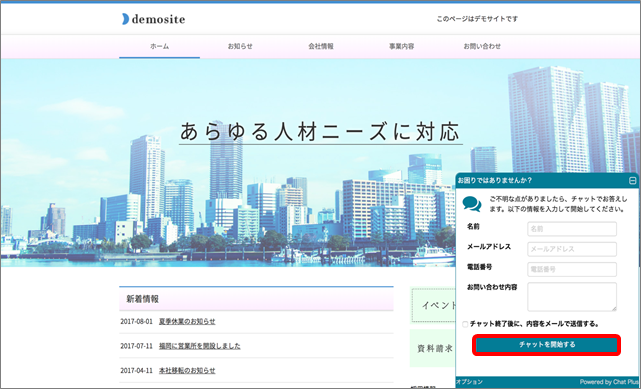
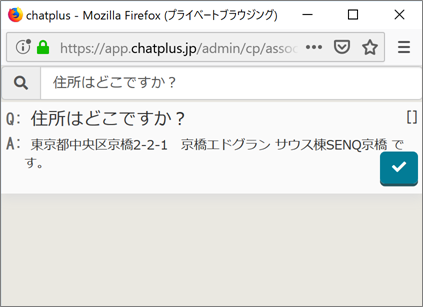
(6)Enter message except for [Hello] and click [Send]. Here, enter "I want to know the inquiry time".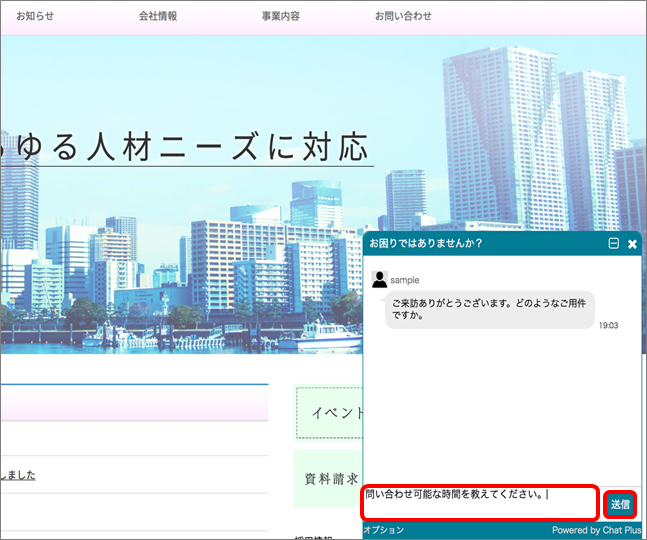
(7)Watson analyzed entered message and chose the best answer from the Knowledge Base. 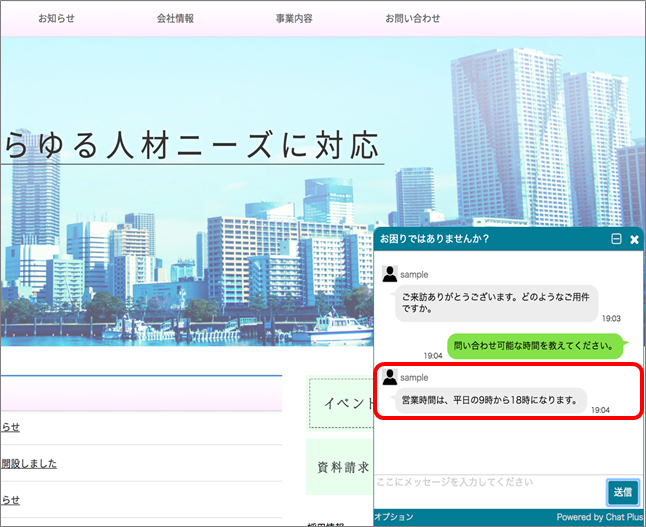
1.Add answers in Knowledge Base
When the text user entered was unexpected, you can register new data in Knowledge Base.
(1)Click the setting button on the upper right of the management page.
(2)Click [Chat]>[Function]>[Knowledge Base] on the left side of the screen.
(3)Click [+Add]
(4)Enter questions in [Q], and answers in [A] and check in the box "Automatic register when learned" and click [Update].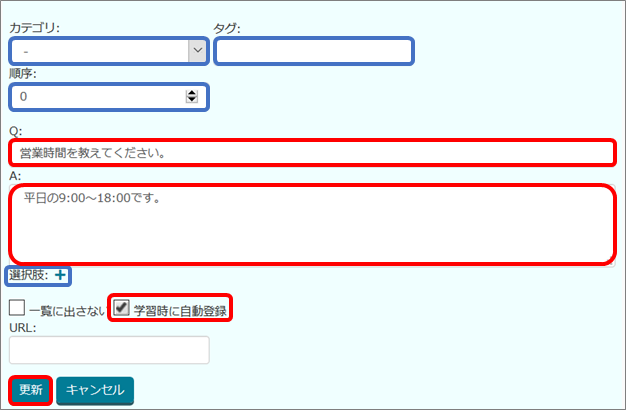
Category:You can designate category in Knowledge Base
Tag:You can designate tag in Knowledge Base
Order:You can designate display order
Choices:You can designate choices to display when applicable answer was sent.
Other boxes will not be used when linking with Watson.
(5)Click [External link]>[App] on the left side of the screen.
(6)Click [Watson]
(7)Check in boxes "Make it learn this Knowledge Base of this site" and "Re-learn" and click [Send].
※Please note that it will cost hundreds of yens every time Watson learns something. For more information about costs, please make an inquiry to IBM.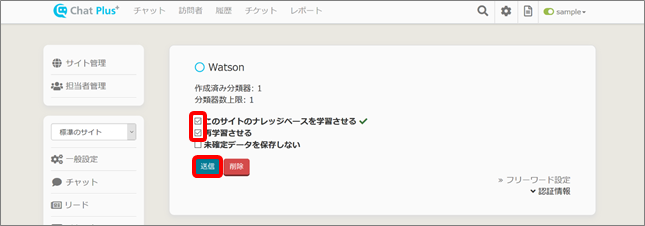
(8)The arrow will start spinning beside "Make it learn this Knowledge Base of this site". 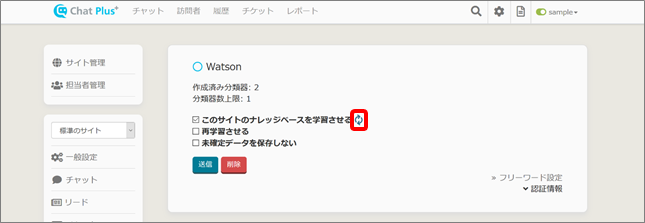
(9)Please wait for a while until the icon stopped spinning and becomes a check mark.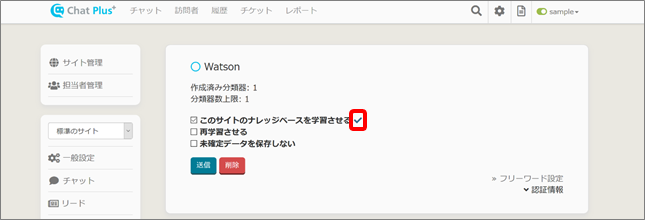
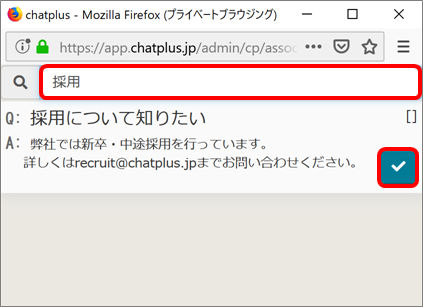
2.Maintenance unidentified data
The inquiry data to Watson is automatically saved to [Unidentified data]. You can maintenance those data effectively by moving data from [Unidentified data] to [Free word setting].
(1)Click the setting button on the upper right of the management page.
(2)Click [External link]>[App] on the left side of the screen.
(3)Click [Watson]
(4)Click [Free word setting] 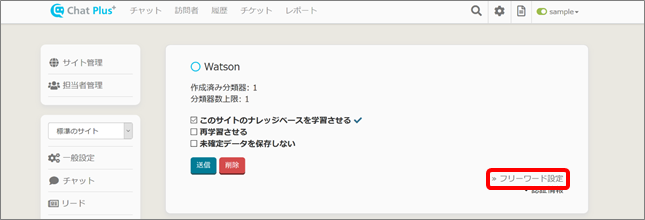
(5)Click [Unidentified data]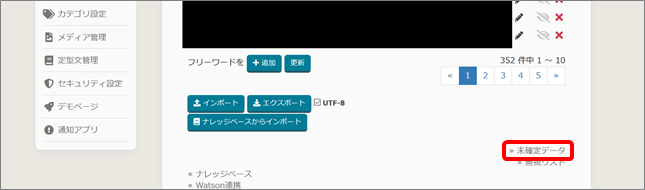
(6)It will be displayed as the text user entered is「Free word (phrase, sentence)」, the Knowledge Base Q which resemble the most as Watson identified is「assumed class name」, the resemblance rate at that time is「resemblance rate」. 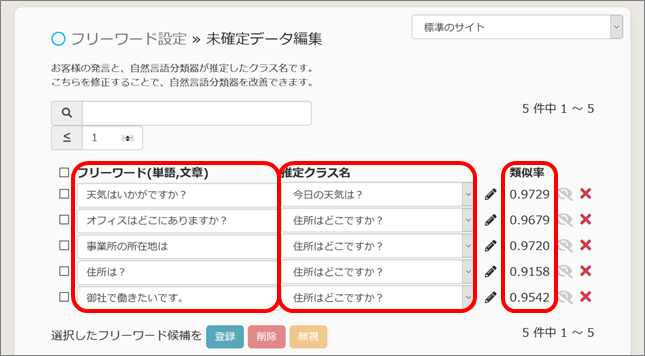
(7)If the [Assumed class name] is wrong, click [pen mark]. 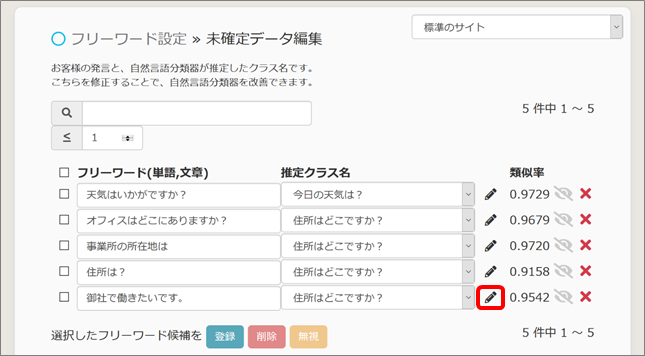
(8)[Knowledge Base] will be displayed.
(9)Enter text in the search window to search the right Knowledge Base Q, and click [check button]
(10)Revised data will be reflected. 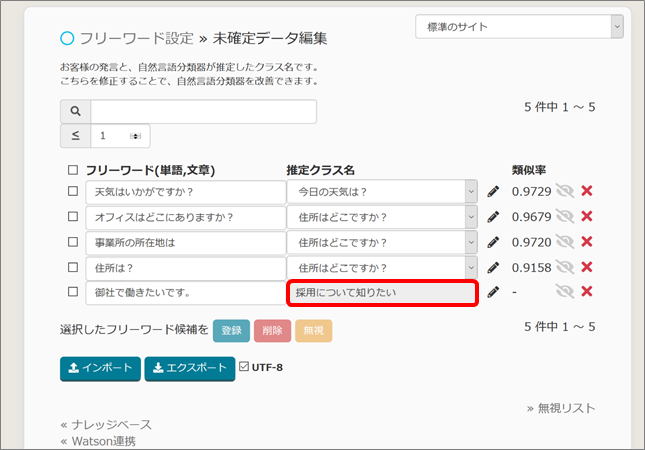
(11)Check in the box on the left of revised data, and click [Register]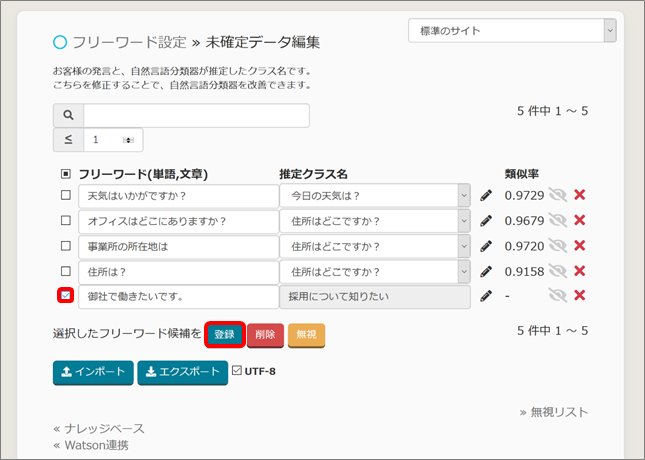
(12)Click [Setting of free words] 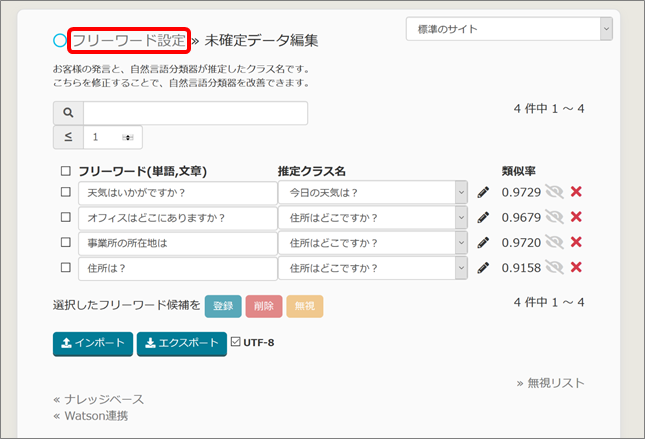
(13)Enter text in search window and check if the text set in (7)-(10) was reflected, click [Link with Watson] 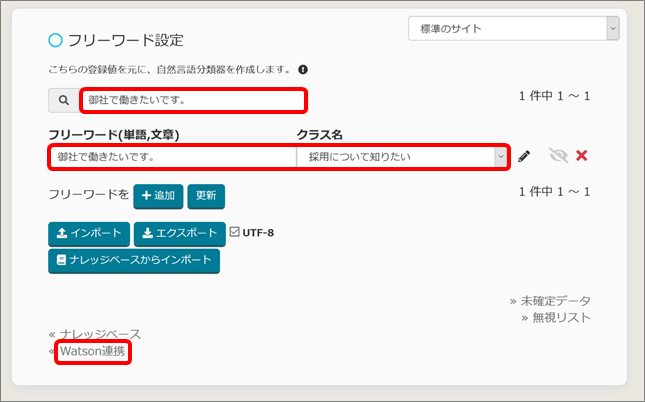
(14)Re-learn with the reference of 「1.Add answers in Knowledge Base」
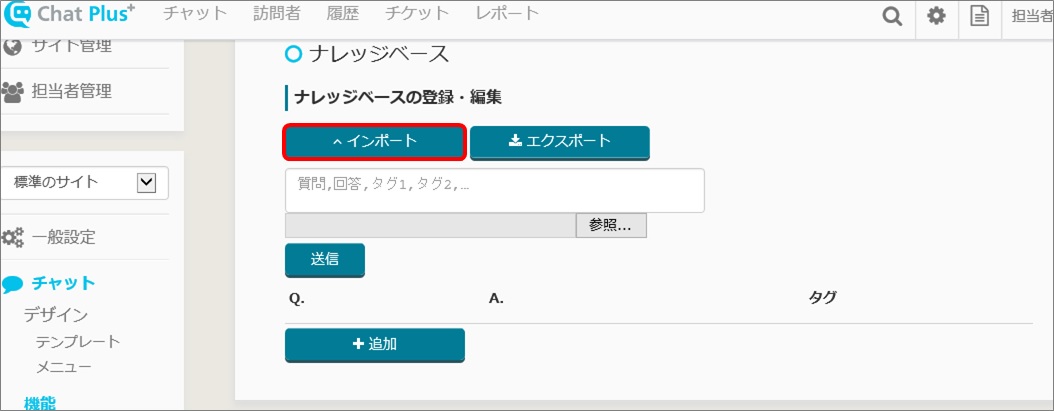
1.Import Knowledge Base in CSV form
You can import Knowledge Base in CSV form. Here is how you do it.
(1)Click the setting button on the upper right of the management page.
(2)Click [Chat]>[Function]>[Knowledge Base] on the left side of the screen.
(3)Click [Import]
(4)Click [Browse], choose an applicable CSV file and click [Send].
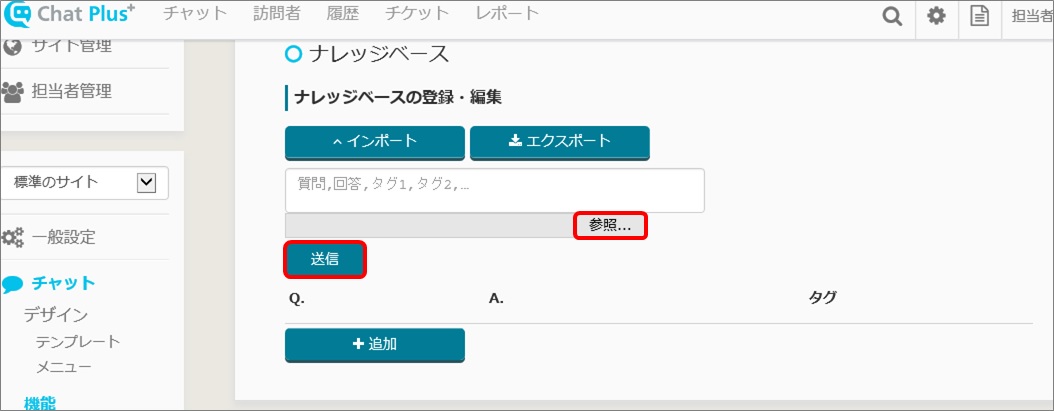
(5)Confirm that the data is imported.

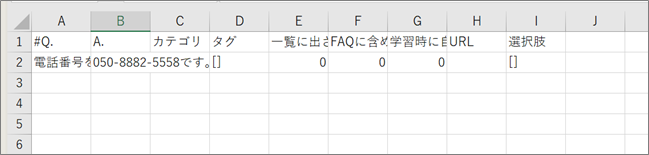
#Q.:Question is entered here
A.:Answer is entered here
Category:Category is entered here
Tag:Tag is entered here
Not displayed on list:This content will not be used when linking with Watson. [0] is entered here.
Not include FAQ:This content will not be used when linking with Watson. [0] is entered here.
Automatic register when learned:[1] is entered here
URL:This content will not be used when linking with Watson. It will be empty.
Choices:The choices is entered here

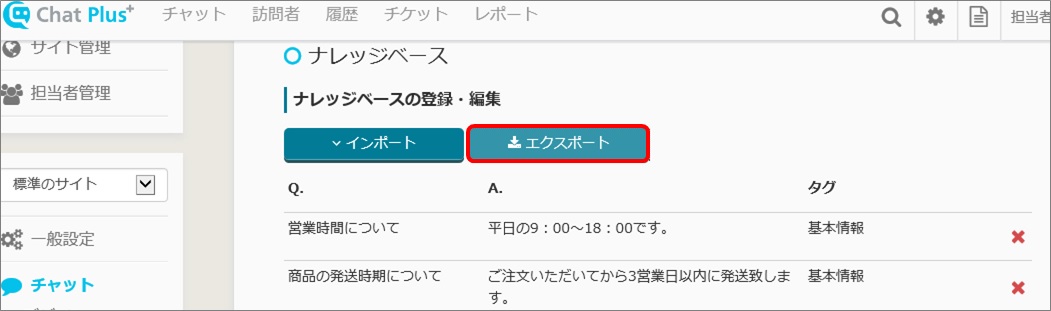
2.Export Knowledge Base in CVS form
You can export Knowledge Base in CVS form. Here, it explains how you do it.
(1)Click the setting button on the upper right of the management page.
(2)Click [Chat]>[Function]>[Knowledge Base] on the left side of the screen.
(3)Click [Export]
(4)「Open or save XXXXX.csv file] will show, click [Save].
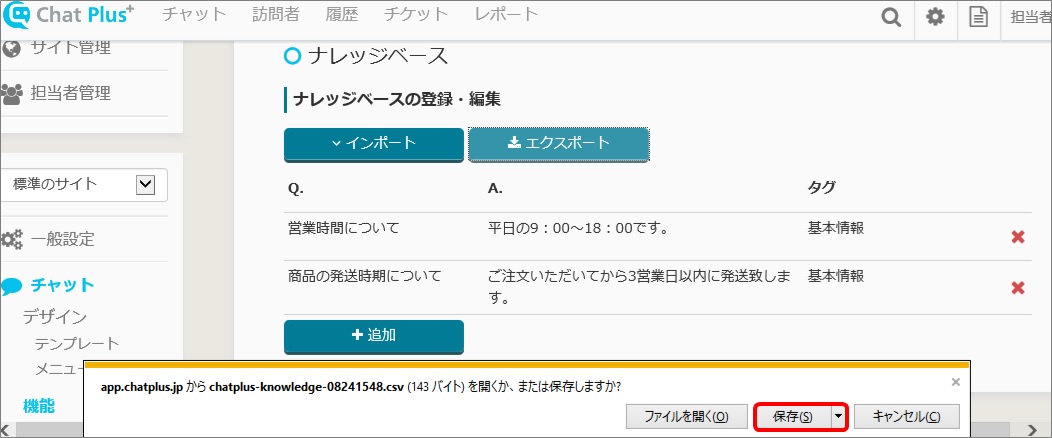
(5)The file will be saved in CSV form, open in Excel to see the data is in it.
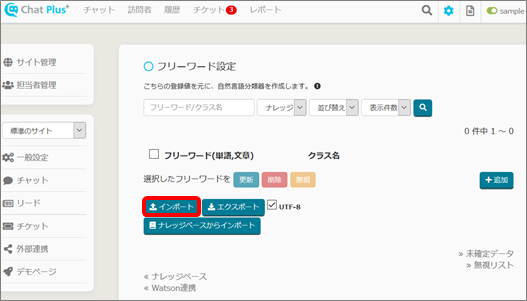
3.Import free word in CSV form
You can import free word in CSV form. Here is how you do it.
(1)Click the setting button on the upper right of the management page.
(2)Click [External link]>[App] on the left side of the screen.
(3)Click [Watson]
(4)Click [Free word setting]
(5)Click [Import]
(6)Click [Browse] and choose CSV file, and click [Send].
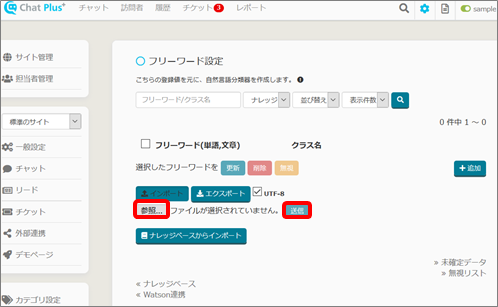
(7)Confirm that the data is imported.
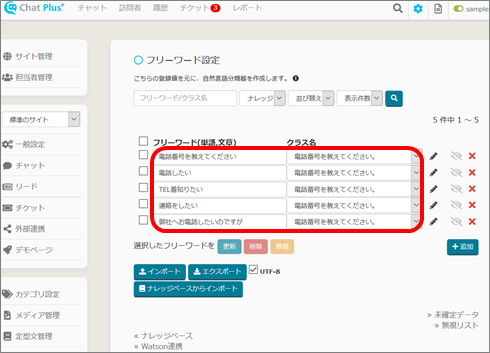
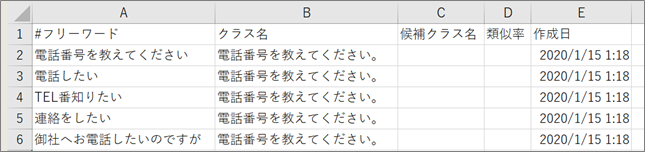
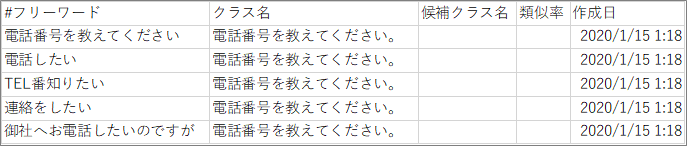
#Freeword:Free word is entered here
Class name:Class name is entered here
Class name candidate:Class name candidate is entered here. (It will not be used when importing)
Resemblance rate:Resemblance rate is entered here. (It will not be used when importing)
Date created:Date created is entered here like [YYYY/MM/DD HH/MM] format. (It will not be used when importing)
4.Export free word in CSV format
You can export free word in CSV format. Here is how you do it.
(1)Click the setting button on the upper right of the management page.
(2)Click [External link]>[App] on the left side of the screen.
(3)Click [Watson]
(4)Click [Free word setting]
(5)Click [Export]
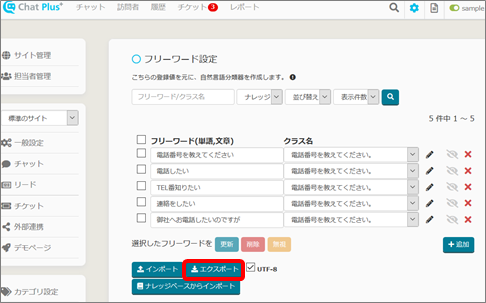
(6)The file will be saved in CSV form, open in Excel and confirm that the data is entered.