In Chat Plus, you can enter contents in Google Spreadsheet what you entered in the text form.
Google Spreadsheet is a calculation software offered by Google, you can enter functions or create a graph like you do in Excel. The different point from Excel is that it can be edited at the same time and it can be saved automatically.
Here, it explains how to link Google Spreadsheet and Chat Plus.
In this page, it will explain how to put the information you entered in the text form in Chat bot+ on Google Spreadsheet.
Prepare Google Spreadsheet
Set Code
(1)Give variables to elements you want to put on a Google Spreadsheet.
※Each variable needs to be different names and don't include spaces.
As an example, we put variables as these below.
| Element | Variable Name |
| Company Name | company |
| Operator | person |
| Phone Number | tel |
| Email Address |
(2)Open Google Spreadsheet you want to record contents, and click [Tool]>[Script Editor] from the menu.
※If there is no Google Spreadsheet, create a new one.
(3)Open [Script Editor] and an editor written as 「function myFunction(){ }」will appear, so copy the code below and and paste in the editor.
function doPost(e) {
    var jsonString = e.postData.getDataAsString();
    var data = JSON.parse(jsonString);

    var sample = data.sample;
    var date = new Date();

    var ss = SpreadsheetApp.openById(SpreadsheetApp.getActiveSpreadsheet().getId());
    var sheet = ss.getSheetByName("シート1");

    sheet.appendRow([sample, date]);
}
(4)In the 5th sentence, there is a code「var sample = data.sample;」, so copy and paste elements set in (1).
(5)In pasted codes done in (4), change「varsample = data.sample;」those two「sample」to the variables you set in (1).
※Do the same procedure for the number of variables.
(6)There is a code like this in the last row,「sheet.appendRow([sample, date])」, change「sample」to the variables you set in (1). Add variables with「,」for the number of variables you have.
※Delete「sample」
Reflect in Google Spreadsheet
(1)Click [Open]>[Introduce as a Web Application...] on the Google Spreadsheet menu.
(2)You will be asked to change project name, so enter project name on your own.
(3) The screen below will appear, from the pull down「Project version」, click 「New」, and from the pull down「Execute the app as」, click 「Me」, and from the pull down「Who has access to the app」, click 「Anyone, even anonymous」.
※After clicking 「New」from the pull down「Project version」, enter value in the box below.(Can be empty)
(4)Click [Deploy]

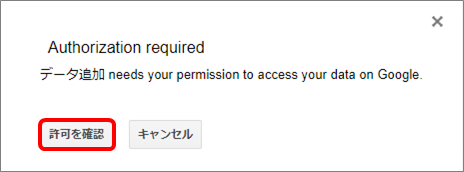
In that case, click [Confirm Authorization]>[Choose Account]>[Detail]>[Move to Add Data]>[Authorize], and that will authorize to access to Google Spreadsheet.
(5)The screen below will appear to let you know that [Deploy has been completed], so copy URL in the box「Current web app URL」.
(6)Click [OK]
Prepare the Chatbot
(1)Click the setting button on the upper right of the management page.
(2)Click [Chat]>[Function]>[Chat bot+] on the left side of the screen.
(3)Click [Add parts]
(4)Enter "Part's name" and "Detail"
※Leave the box at the top right "ID" empty, it will automatically be filled when Chat bot+ is created.
(5)Click [Add rules]
(6)In the section "Display Rule", click「User's Remark」from the pull down, and enter「Add」, and click「Match」from the pull down.
(7) In the section "Action", click [Text form] from the pull down.
(8) Click「postback(JSON)」from the pull down below (7), and paste 「Current web app URL」which you copied in "Reflect in Google Spreadsheet" (5) in the box "Sender URL".
(9)Check in the box "Include chat information in POST data".
(10) In the box "Name" in the text form, enter valuable you set in Set Code(1), and in boxes [Labels] and [Candidate1, Candidate2,...] enter letters of things you want to put.
※In [Label], you should put a title of the content, and in [Candidates], you should put an example of the content.
(11)If you have multiple valuables set in "Set Code"(1), click [Add form element]>[Text form] to add valuables forms.
(12)Enter letters like (10) to added forms.
(13)Click [Update]
(14) From the list of [Chat bot+] rules, click [ON] of the set rule.
※Click and it will switch [ON/OFF].
Action Confirmation
(1) Open chat screen and click [Add]
(2)Receiving user's remark in (1), form to add data to Google Spreadsheet will appear in chat window.
(3)Enter in the form and click [Send]
(4)In the Google Spreadsheet, you can confirm that the contents you entered in (3) is reflected.


