In Chat Plus, you can set to send advertisement as re-targeting to users who took an action.
Example is shown below.
・User clicked [click here if not registered] becomes a target to send ads
・Run a brief estimate and user which has big budget scale becomes a target to send ads
・User clicked [Click here to offer proposal to us] becomes an exception to send ads
※This is to reduce advertisement cost to reverse sales
■User who has high score becomes a target to send ads
■Exception like complainer, the operator will manually give the user original tag and make it an exception to send ads
■Make a diagnostics in Chatbot and send ads according to psycho graphics
Example) In romance diagnosis,
・Give a choice like [when do you want to get married by?]
→Send ads to users who want to get married soon
・In wasteful habit diagnosis, he/she does a big shopping in secret to their family [YES or NO?], and if the user clicked [YES], send ads to them.
Proceed the setting according to these steps below.
2.Set Google ads -Create an event-
■Create a template event in Chat Plus
■Check Google Analytics screen
■Create an event in Chat Plus
3.Set Google ads -Setting of Google Analytics-
■Create an audience list in GoogleAnalytics
■Tie up a created list to Google ads
4.Set Facebook ads -Create an event-
■Create an event in Chat Plus
5.Set Facebook ads -Setting of the GoogleTagManager-
■Set a trigger
■Set a tag
6.Set Facebook ads -Create a custom audience-
Manual offered by:Keyword Marketing K.K.
1.Create a Chatbot
First, create a Chatbot which becomes a trigger to actions.
(1)Click the setting button on the upper right of the management page.
(2)Click [Chat]>[Function]>[Chat bot] on the left side of the screen.
(3)Click [+Add automatic response]
(4)Set messages and choices
※Here, as an example, it is set to display message and choices 3 seconds after displaying a designated page.
(5)Click [Register]
(6)From the list of Chatbot rules, click [ON] of the set rule.
※Click and it will switch [ON/OFF]
2.Set Google ads -Create an event-
Create a template event in Chat Plus
(1)Click the setting button on the upper right of the management page.
(2)Click [External link]>[App] on the left side of the screen.
(3)Click [Google Analytics]
(4)Check in the box beside "eventAction" which you want to track.
※If you want the content to be considered as "no interaction" on Google Analytics, click in the box on the right [No interaction]. For example, if you do not want interaction if it is [only displayed the chat], check in the box on the right.
(5)After checking in boxes, click [Update].
※The box "Detailed setting" should be empty.
Check Google Analytics screen
Check if the setting of「Create template event」is reflected.
■Operation on Chat Plus
(1)Click the setting button on the upper right of the management page.
(2)Click [Demo Page] on the left side of the screen.
(3)Make an action like sending a message to the displayed chat.
※If you set to eliminate your company's IP address on Google Analytics, set to undo it or test on your smartphone.
■Operation on Google Analytics
(1)Access to Google Analytics and click [Action]>[Event]>[Detail] on the left side of the screen.
(2)Confirm that there is [Chat Plus] in the [Event category].
(3)In the section "Event action", check to see if the [inChat] and [inChatFirst] checked in 「■Operation on Chat Plus」is displayed which means the setting is reflected.
※In the section "Event label", the fired event's URL will be entered.
Create an event on Chat Plus
Create a Chatbot to fire event on user's remark and frequency on Google Analytics.
(1)Click the setting button on the upper right of the management page.
(2)Click [Chat]>[Function]>[Chat bot+] on the left side of the screen.
(3)Click [Add parts]
(4)Enter "Part's name" and "Detail"
※Leave the box at the top right "ID" empty, it will automatically be filled when Chat bot+ is created.
(5)Click [Add rules]
(6)Set rule to track
(7)In the section "Action", click [Fire event] from the pull down.
(8)Click [GA] from the pull down below.
(9)Enter event name in the box "Event's name".
(10)Enter code in the box below.
{
"hitType": "event",
"eventCategory": "Chatplus",
"eventAction": "Word you want to display on event action",
"eventLabel": "Word you want to display on event label",
"eventValue": "1"
}
※"hitType"、"eventCategory"、"eventAction"are required.
On Google Analytics, it will be displayed as "eventCategory"、"eventAction"、"eventLabel", in "eventAction", enter word that can specify the event.
(11)Click [Update]
(12)From the list of Chat bot+ rules, click [ON] of the set rule.
※Click and it will switch [ON/OFF]
3.Set Google ads -Create an event-
Create an audience list on Google Analytics
(1)Access Google Analytics, and click [Management] on the left side of the screen.
(2)The management page will be displayed, click [Property]>[User definition]>[Audience].
(3)Click [+Add new audience]
(4)Click [Create new]
(5)Click [Condition]
(6)Click [Event action] from the pull down.
(7)Enter event's name in the box, and set conditions for audience list.
※Set conditions based on Procedure [Create a template event on Chat Plus] and procedure [Create an event on Chat Plus].
(8)Click [Apply]
(9)Click audience name in the box.
※It is advisable to name recognizable name for when looking at the data later.
(10)Click [Next Step]
Tie up created list to Google ads
(1)After creating an audience list, a screen to set publishing destination will appear. Click account of Google ads you want to use from the "+Add address" pull down.
(2)Confirm that applicable Google ads account is selected, and click [Publish]. This can set a list to tie up with Google ads account.
(3)Log into Google ads account selected in (1), and check if the created list is displayed in audience manager.
If the Google ads account is not displayed in (3), you need to link Google Analytics account and Google ads account.
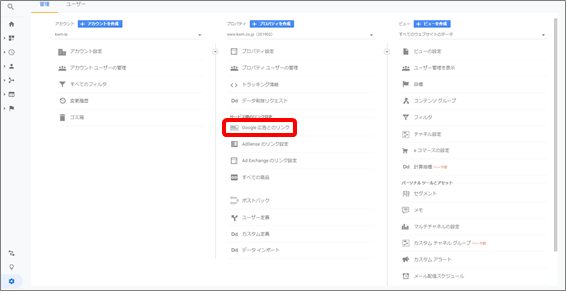
(1)Access Google Analytics and click [Manage] on the left side of the screen.
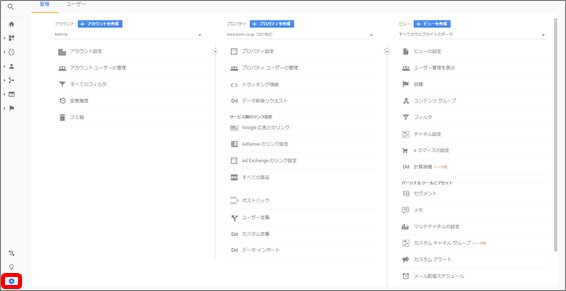
(2)Click [Link with Google ads]
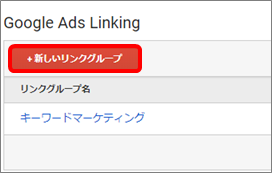
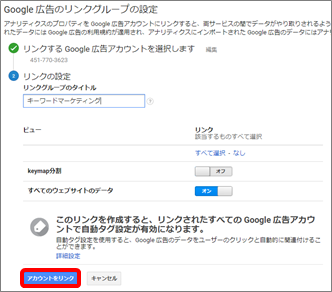
(3)Click [+Add new link group]
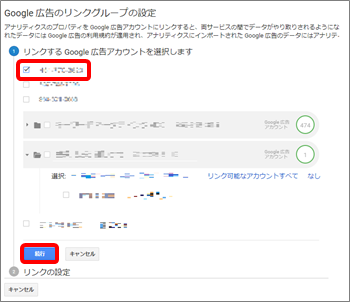
(4)Check in the account you want to link and click [continue]
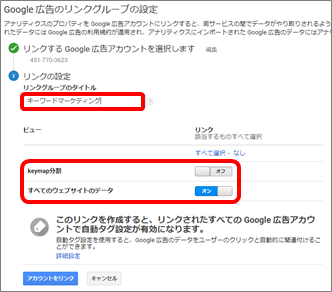
(5)Click title of the link group in the box and click [ON] of the property view you want to include Google ads.
(6)Click [Link account]
4.Set Facebook ads -Create an event-
Create an event on Chat Plus
(1)Click the setting button on the upper right of the management page.
(2)Click [Chat]>[Function]>[Chat bot+] on the left side of the screen.
(3)Click [Add parts]
(4)Enter "Part's name" and "Detail"
※Leave the box at the top right "ID" empty, it will automatically be filled when Chat bot+ is created.
(5)Click [Add rules]
(6)Set rules to track
(7)In the section "Action", click [Run script] from the pull down.
(8)Enter code below in the box.
dataLayer.push({
 'event' : 'Event's name'
});
(9)Click [Update]
(10)From the list of Chat bot+ rules, click [ON] of the set rule.
※Click and it will switch [ON/OFF]
5.Set Facebook ads -Set GoogleTagManager-
Set trigger
First, you set trigger in GoogleTagManager.
(1)Open management page of the GoogleTagManager, and click [Trigger] on the left side of the screen.
(2)Click [New]
(3)Enter trigger's name in the box "Trigger with no name".
(4)Click [Start setting by choosing trigger type" at the center of the screen.
(5)[Choose trigger type] will be displayed, click [Custom event] from the list.
(6)In the box "Event name", enter event name which you set in「Create an event on Chat Plus」(8).
(7)In the section "Generation place of this trigger", check in "All custom event".
(8)Click [Save]
Set tag
Next, we will set tags on GoogleTagManager.
(1)Click [Tag] on the left side of the screen.
(2)Click [New]
(3)Enter tag name in the box "Tag with no name".
(4)Click [Start setting by choosing tag type] at the center of the screen.
(5)[Choose tag type] will be shown, click [Custom event] from the list.
(6)Enter code below in HTML box.
※[Name] should be filled with the event name shown on the Facebook management page.
<script>
  fbq('trackCustom', 'Name');
</script>
(7)Click [Deliver this tag by choosing this trigger]
(8)Click and choose the trigger you set in [Set trigger]
(9)Click [Save]
(10)Click [Preview], and check if the [Work space while previewing] in orange will show up.
(11)Open the site which using Chat Plus service in the same browse, and do the action of the event you set in「4.Set Facebook ads -Create an event-」.
(12)If the set tag is shown in the [Tags Fired On This Page] which appears from the bottom of the page, activation confirmation is done.
(13)Click [End preview mode] and click [Publish]
6.Set Facebook ads -Create custom audience-
Next, we will create custom audience on Facebook ads.
(1)Open [Event Manager] on the management page of Facebook ads, and confirm that event you set in「5.Set Facebook ads -Set GoogleTagManager-」>「Set tags」(6) is active.
(2)Click [Audience] from the menu at the top left of the screen.
(3)Click [Create custom audience]
(4)Click [Website]
(5)Click event which you checked in (1) from the pull down "All user accessed in the website".
(6)Choose the length of date audience can remain and enter in the box "Name audience".
(7)Click [Create an audience]


